Why the 512GB Upgrade Path Matters After Waitlists Ended
With the 2TB Steam Machine waitlist closed and the $1,049 512GB model open for direct Add to Cart orders while supplies last, upgrading the 512GB configuration yourself has become the fastest route to a high-capacity Steam Machine. Modern AAA releases frequently consume 100GB to 150GB per install, which leaves room for only three or four blockbuster titles on a stock 512GB drive after SteamOS and shader caches take their share.
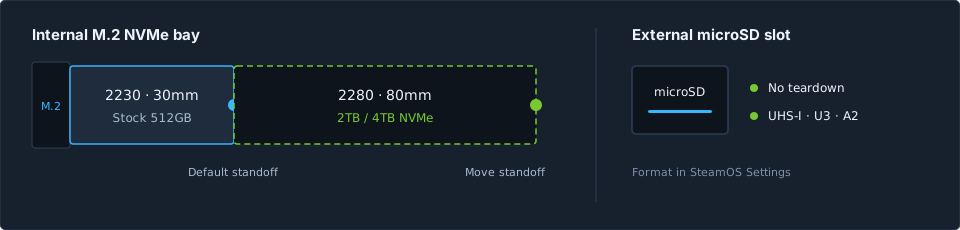
Fortunately, hardware teardowns and iFixit repair documentation confirm that Valve designed the Steam Machine's single internal M.2 NVMe bay to accept both compact M.2 2230 drives and standard full-length M.2 2280 desktop SSDs.
M.2 2230 vs. M.2 2280 Support and the Relocatable Standoff
Out of the box, the 512GB Steam Machine typically ships with an M.2 2230 NVMe SSD (30mm long). Rather than locking owners into pricier 2230-only drives, the Steam Machine internal chassis includes mounting points for full-size M.2 2280 NVMe SSDs (80mm long).
Why this matters for your budget:
- Lower cost per terabyte: Standard M.2 2280 PCIe Gen 4/Gen 3 desktop drives are widely stocked and generally cost less per gigabyte than 2230 drives.
- Higher capacity ceiling: Community teardown tests have already confirmed compatibility with 2TB and 4TB M.2 2280 NVMe upgrades.
- Relocating the standoff: Switching from the stock 2230 drive to an 80mm 2280 stick requires unscrewing and moving the small SSD retention standoff post from the 2230 position to the 2280 mounting hole (a 5mm socket or small pliers helps grip the standoff cleanly).
Tools and Preparation Before Opening the Case
While accessing the single DDR5 SODIMM RAM slot requires deeper disassembly, reaching the M.2 SSD bay is manageable if you work carefully on a static-free surface:
- Drivers & prying tools: A Torx screwdriver (T8 or T9 depending on revision) plus a plastic spudger for separating the front shroud without marring the chassis.
- Replacement drive: A single-sided M.2 2280 or M.2 2230 NVMe SSD (PCIe Gen 3 or Gen 4). Avoid drives with bulky aftermarket heatsinks that interfere with tight compact-chassis clearance.
- SteamOS recovery USB drive: Download the official SteamOS recovery image onto a spare USB flash drive before tearing down the unit, and have a wired or wireless USB keyboard ready for initial boot prompts.
High-Level SSD Swap Steps
- Power down and unplug completely: Shut down SteamOS fully, disconnect the AC power cable (the Steam Machine houses an internal PSU), and unplug all peripherals.
- Open the enclosure: Loosen the rear fasteners and concealed screws under the rubber feet as documented in teardown guides, then carefully release the front shroud with a plastic spudger to slide out the internal housing.
- Swap the NVMe drive: Remove the retention screw holding the stock 512GB M.2 2230 drive, slide the drive out at a slight angle, relocate the retention standoff if installing an M.2 2280 drive, seat your new SSD firmly, and secure the screw.
- Reassemble and re-image SteamOS: Close the shell, connect your prepared SteamOS USB recovery stick, boot into the recovery environment, and flash SteamOS onto the new NVMe drive.
Caution: Valve advises care when opening compact hardware, and any physical damage caused during a DIY teardown is outside standard warranty coverage. If you prefer not to open the case, use the external microSD option below.
Zero-Teardown Alternative: Adding an A2 microSD Card
Every Steam Machine includes an external microSD card slot. Inserting a reputable UHS-I, U3, A2-rated 512GB or 1TB microSD card lets you format and expand your Steam library inside SteamOS settings in under two minutes with zero tools.
In real-world gameplay, load times from a quality A2 microSD card are typically only a few seconds slower than internal NVMe storage. The main trade-off shows up during heavy writes: downloading massive games, unpacking compressed patches, and managing shader caches (which still reside on the internal 512GB drive) run noticeably slower than on a native 2TB internal NVMe SSD.
Want to see exact total costs for 2TB NVMe, 4TB NVMe, and 1TB microSD setups against the $1,349 factory 2TB price? Open our Steam Machine 512GB vs 2TB Cost Calculator, check the 2TB waitlist status, or return to our full brief on Valve ending Steam Machine waitlists.